Installing openSUSE Tumbleweed on the Enclustra Mars MA3
11. Nov 2021 | KaratekHD, Phillip (phillip@lochte.dev) | CC-BY-SA-3.0

As part of my school internship at TEM Messtechnik I got the oppertunity to work on the Enclustra Mars MA3, a FPGA SoC with two ARMv7 cores. This post describes the process of getting Linux (more precisely, openSUSE Tumbleweed) to work on this SoC.
Requirements
In order to build and install all the needed files, you’re gonna need the following:
- 1x Enclustra Mars MA3
- 1x Enclustra Mars EB1
- A computer capable of running Linux, in this case openSUSE Tumbleweed
- A computer running Windows (we need it for the flash tool)
- 1x MicroSD Card.
Setting up the build environmentee
Setting up the build environment is not difficult, but it is not a “clean” way of using a Linux system. We’re gonna need some packages that are not maintained anymore and are therefore not avaliable in the openSUSE Tumbleweed repositories. Installing packages from unofficial repositorys can be dangerous for your system though, so the first thing we’re gonna do is create a filesystem snapshot:
snapper create --description "Snapshot before installing Enclustra build environment"
This will create a Btrfs snapshot so that we can rollback (snapper rollback)to the state of the system before installing the build environment. Because no --cleanup-algorithm is specified this snapshot will not get removed after a certain period of time.
First, we need to add some repositorys:
sudo zypper ar https://download.opensuse.org/repositories/Kernel:/tools/openSUSE_Factory/Kernel:tools.repo
sudo zypper ref
Now we can install all the dependencies we need:
sudo zypper install gcc48 gcc48-c++ git autoconf bc curl glibc-32bit mercurial unzip wget make patch openssl-devel python3-termcolor
In addition, we need a really old version of python-dialog, which is not avaliable for Tumbleweed, so we need to install it manually from an unsupported repository:
sudo zypper in https://download.opensuse.org/repositories/openSUSE:/Leap:/42.3/standard/noarch/python-dialog-3.3.0-8.1.noarch.rpm
Under normal circumstances, you should never ever install a package from Leap in Tumbleweed! The only reason we can do this here is that Leap 42.3 won’t change anymore (since it is discontinued) and I tested that everything works. Never do this regularly!!! You have been warned.
We need to set the default compiler:
sudo update-alternatives --install /usr/bin/gcc gcc /usr/bin/gcc-4.8 50
sudo update-alternatives --install /usr/bin/g++ g++ /usr/bin/g++-4.8 50
sudo update-alternatives --install /usr/bin/cc cc /usr/bin/gcc-4.8 50
Now, we can finally install the buildtool:
git clone https://github.com/enclustra-bsp/bsp-altera.git && cd bsp-altera
Since we want to get openSUSE Tumbleweed running instead of the default (bare bones) Linux Enclustra provides, we do not need to build the root filesystem. We do need to build however a bootloader (U-Boot) and a Linux Kernel. Both these parts are part of the openSUSE distribution, but the versions in the repositorys are not compatible with the Mars MA3, so we need to build the versions provided by Enclustra. The version of the Linux kernel provided is not up to date though, but I won’t go into detail on how to build an upstream Linux kernel in this post.
To start the build process, run
./build.sh -d Mars_MA3/Mars_EB1/MMC -x Linux -x U-Boot
The process is going to take some time, so go grab some tea (or coffee, if you prefer that for whatever reason…).
After the build succeeds, you can find the build results in a folder named out_<timestamp>_<module>_<board>_<bootmode>.
In my case that is out_20211105094426_Mars_MA3_Mars_EB1_MMC.
Partitionizing the SD Card
The SoC expects a specific partitionizing on our SD card, which we need to create manually using fdisk (replace /dev/mmcblk0 with the block name of the SD card):
sudo fdisk /dev/mmcblk0
Use fdisk as the following:
Welcome to fdisk (util-linux 2.36.2).
Changes will remain in memory only, until you decide to write them.
Be careful before using the write command.

Device does not contain a recognized partition table.
Created a new DOS disklabel with disk identifier 0x99faaaa1.

Command (m for help): o
Created a new DOS disklabel with disk identifier 0x8c918d1b.

Command (m for help): n
Partition type
   p   primary (0 primary, 0 extended, 4 free)
   e   extended (container for logical partitions)
Select (default p): p
Partition number (1-4, default 1): 2
First sector (2048-16777215, default 2048):
Last sector, +/-sectors or +/-size{K,M,G,T,P} (2048-16777215, default 16777215): +2M

Created a new partition 2 of type 'Linux' and of size 2 MiB.

Command (m for help): a2
Selected partition 2
The bootable flag on partition 2 is enabled now.

Command (m for help): n
Partition type
   p   primary (1 primary, 0 extended, 3 free)
   e   extended (container for logical partitions)
Select (default p): p
Partition number (1,3,4, default 1): 1
First sector (6144-16777215, default 6144):
Last sector, +/-sectors or +/-size{K,M,G,T,P} (6144-16777215, default 16777215): +200M

Created a new partition 1 of type 'Linux' and of size 200 MiB.

Command (m for help): t
Partition number (1,2, default 2): 1
Hex code or alias (type L to list all): c

Changed type of partition 'Linux' to 'W95 FAT32 (LBA)'.

Command (m for help): n
Partition type
   p   primary (2 primary, 0 extended, 2 free)
   e   extended (container for logical partitions)
Select (default p): p
Partition number (3,4, default 3): 3
First sector (415744-16777215, default 415744):
Last sector, +/-sectors or +/-size{K,M,G,T,P} (415744-16777215, default 16777215):

Created a new partition 3 of type 'Linux' and of size 7.8 GiB.

Command (m for help): w
The partition table has been altered.
Syncing disks.
After the partitioning is done, we can download the Tumbleweed root filesystem, which gets built by the openSUSE Build Service. Our SoC has an armv7 architecture, so we need the rootfs for that specific architecture.
Download the image wget:
wget http://download.opensuse.org/ports/armv7hl/tumbleweed/appliances/openSUSE-Tumbleweed-ARM-JeOS.armv7-rootfs.armv7l.tar.xz
You’re also gonna need my deploy script, which makes flashing everything to a MicroSD card really simple. Download it and make it executable:
wget https://code.opensuse.org/KaratekHD/MA3/raw/main/f/deploy.py
chmod +x deploy.py
Usage of the deploy script is really simple:
usage: deploy.py [-h] -r ROOTFS -d DEVICE -i INPUT_DIR

Deploy openSUSE Tumbleweed to the Mars MA3.

optional arguments:
  -h, --help            show this help message and exit
  -r ROOTFS, --rootfs ROOTFS
                        Path to rottfs.tar
  -d DEVICE, --device DEVICE
                        Deviceprefix to deploy to (e.g. /dev/mmcblk0p)
  -i INPUT_DIR, --input_dir INPUT_DIR
                        Build files generated by build.sh
An example of using the deploy script:
./deploy.py \\
-d /dev/sdb \\
-r /home/jens/bsp-altera/openSUSE-Tumbleweed-ARM-JeOS.armv7-rootfs.armv7l.tar.xz \\
-i out_Mars_MA3_Mars_EB1_MMC/
Replace the paths with the ones matching for your situation.
Warning: If your SD-Card is the block device /dev/sdb, use dev/sdb as the parameter for -d. If your block device is e.g. /dev/mmcblk0 , you’ll need to use /dev/mmvblk0p as the parameter for -d.
Also, it is important that you use an absolut path for the rootfs, even if it is located in the same directory.
The script will ask for your root password and then
- Format the partitions of the SD card with the required file systems
- Flash the preloader and the Linux Kernel
- Extract the rootfs to the SD card
An example output would be:
Formatting partition 1 with fat32...
mkfs.fat 4.2 (2021-01-31)
Formatted partition 1
Formatting partition 3 with ext2...
mke2fs 1.46.4 (18-Aug-2021)
/dev/sdb3 contains a ext2 file system labelled 'rootfs'
	last mounted on / on Thu Jan  1 01:00:01 1970
Proceed anyway? (y,N) y
Creating filesystem with 15539968 4k blocks and 3891200 inodes
Filesystem UUID: b229ef5a-d94a-4851-bd70-c8c00c52fadb
Superblock backups stored on blocks:
	32768, 98304, 163840, 229376, 294912, 819200, 884736, 1605632, 2654208,
	4096000, 7962624, 11239424

Allocating group tables: done
Writing inode tables: done
Writing superblocks and filesystem accounting information: done

Formatted partition 3
Flashing preloader...
512+0 records in
512+0 records out
262144 bytes (262 kB, 256 KiB) copied, 0.0645477 s, 4.1 MB/s
Preloader flashed!
Syncing...
Synced!
Mounting /mnt/rootfs
Mounting /mnt/boot
Copying files to /mnt/boot
- uImage
- devicetree.dtb
- fpga.rbf
- u-boot.img
- uboot.scr
Removing everything from /mnt/rootfs...
Extracting rootfs from /home/jens/bsp-altera/openSUSE-Tumbleweed-ARM-JeOS.armv7-rootfs.armv7l.tar.xz to /mnt/rootfs...
Extracted /home/jens/bsp-altera/openSUSE-Tumbleweed-ARM-JeOS.armv7-rootfs.armv7l.tar.xz to /mnt/rootfs
Syncing...
Umounting devices...
Done
After the script did its magic, it’s time to move on.
Building U-Boot
In our experiences, we couldn’t get the SoC to use the U-Boot image deployed to the SD Card. U-Boot is, however, required to boot the Linux kernel, so we need some other way to get U-Boot to run, which, in this case, is to flash it to the QSPI Flash of the SoC itself.
In order to do this, we need to build a version of U-Boot that works from QSPI. To do this, navigate to the build directory and run
./build.sh -d Mars_MA3/Mars_EB1/QSPI -x U-Boot
Now, navigate into the output folder (e.g. ./out_Mars_MA3_Mars_EB1_QSPI) and transfer u-boot.img and preloader-mkimage.bin to the Windows PC.
Setting up the board
 In order to get the board to boot from the QSPI Flash (and aafter that from the SD card) and to give us a seral output, we need to set up the dipswitches (see above) as following:
| Dipswitch | Value |
|---|---|
| A1 | On |
| A2 | Off |
| A3 | Off |
| A4 | On |
| B1 | Off |
| B2 | Off |
| B3 | Off |
| B4 | Off |
Now you can connect a Micro-USB cable to USBUB (see the image above) and use it to flash to the QSPI and use a serial console as described below.
Flashing the bootloader
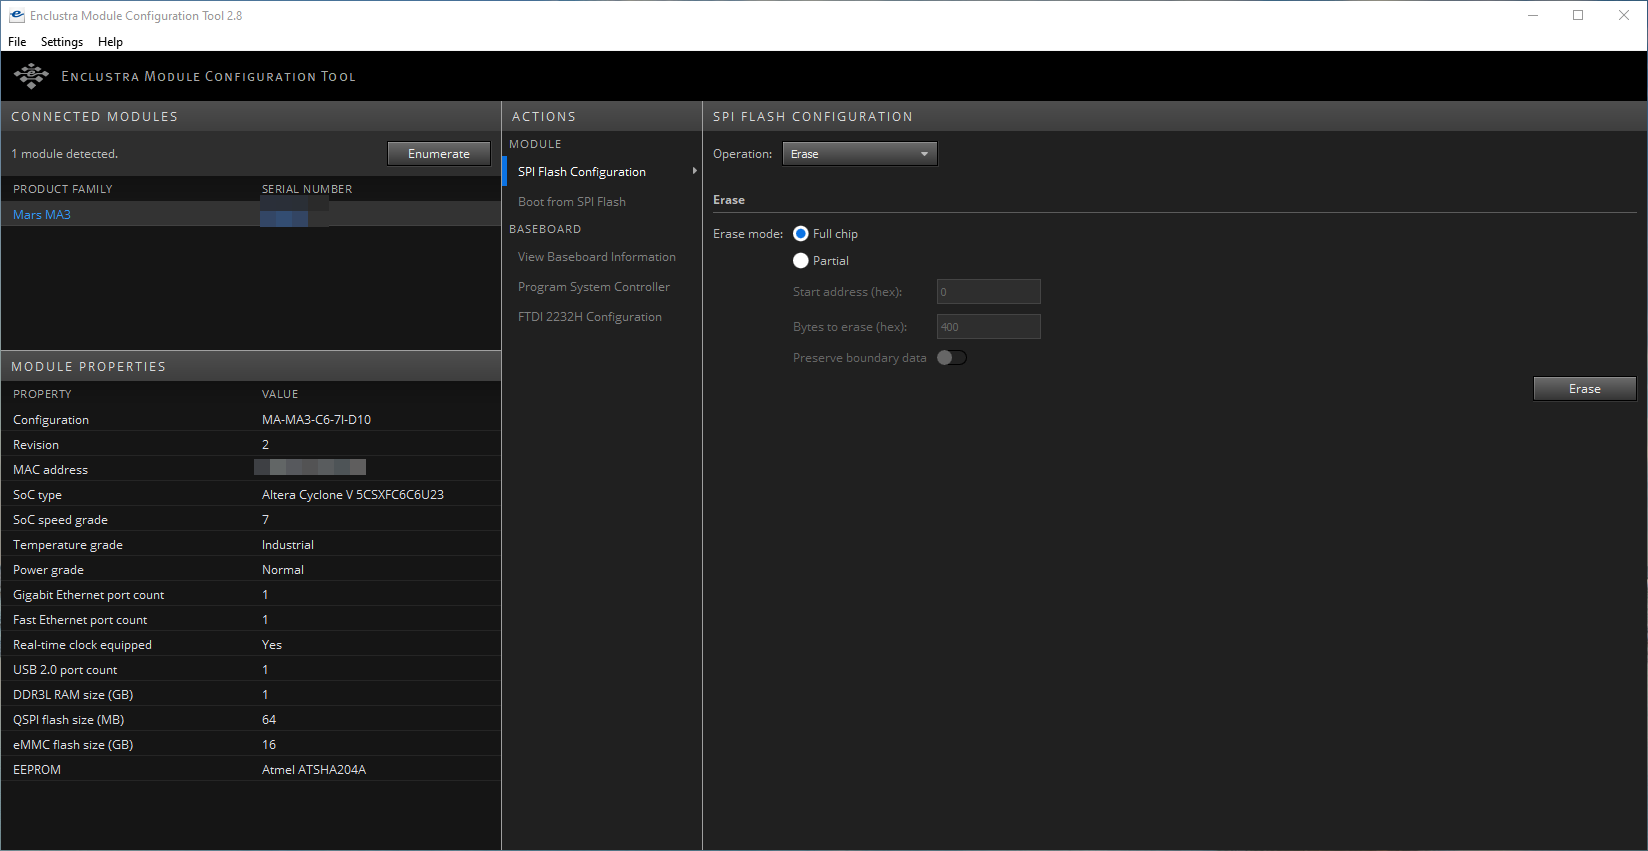
Connect the Board to the Windows PC via USB, power it using the dc input on the evaluation board and click on “Enumerate” in MCT. Make sure no other serial devices are connected to your PC. For example a USB-Jtagger can cause problems. The board should show up in the list.
In the “Operation” drop-down menu, select “Erase”, select “Full chip” and click on the “Erase” button:

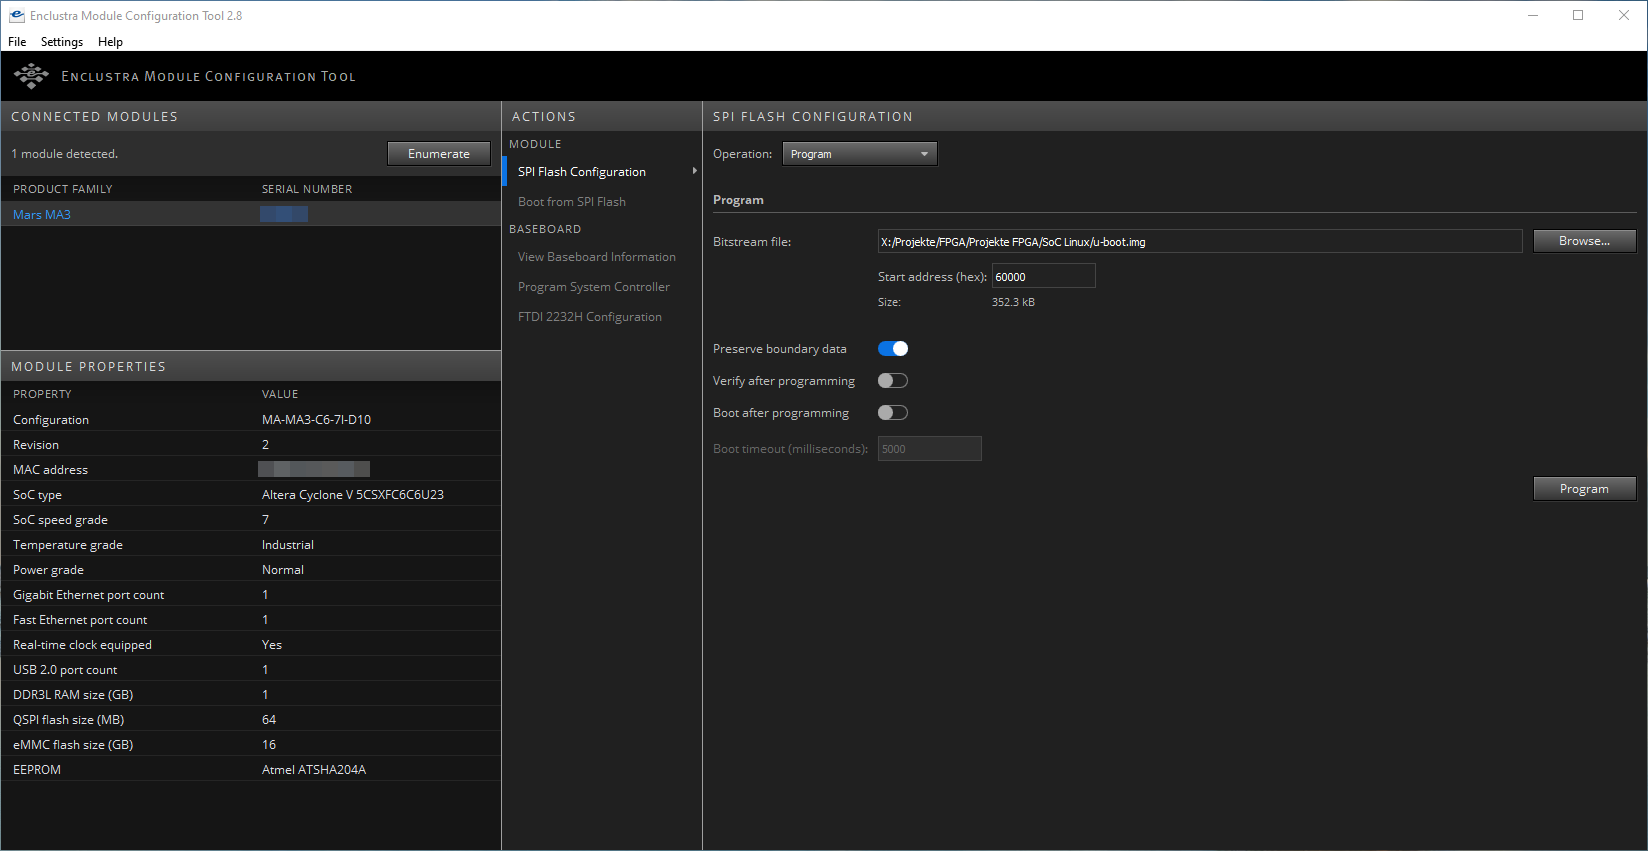
In the next step, select “Program” from the “Operation” drop-down menu. Set the Start address to 0, enable “Preserve boundary data” and disable “Boot after programming”. Now select the preloader-mkimage.bin file as the Bitstream file and click on “Program”.
Once the preloader has been flashed, set the Start address to 6000 and select the U-boot.img file as the bitstream file. Keep the rest of the settings as descibed above and click “Program” again.

Connecting to a serial console
Now connect the Board to a PC via USB (TODO @Phillip: Switches für Serielle Konsole?). Use Putty, Minicom, Picocom or whatever tool you prefer to use to connect via serial to the Board, just make sure to set the Baudrate to 115200.

Configuring U-Boot
With a serial console connected, power on the Board. You’ll see some output, but wait until you see a little arrow (=>) in the line at the bottom.
Now, type
setenv bootcmd "run mmcboot"
saveenv
Now your board will boot from the SD card by default. Now it’s time to actually boot Linux, so power off the board. U-Boot does not have a shutdown command, so just pull the power plug.
Booting the Linux operating system
Insert the MicroSD card into the slot on the Board. and power on the board. This time you should get a lot more output then before, because this time it actually boots into Linux. There are gonna be a lot of lines starting with [OK] in green, but also a few starting with a red [FAILED]. That’s fine though, everything works even with these minor failures.
Once it’s done booting, you should see something like this on the serial console:
Welcome to openSUSE Tumbleweed 20211107 - Kernel 4.15.0-g506369939 (ttyS0).

eth0:

localhost login:
That’s it! You succesfully installed openSUSE Tumbleweed on your Mars MA3, sou you can now use it like every regular Tumbleweed machine. The default credentials are root:linux, so make sure to change them using passwd before doing anything else. I also recommend to do a quick zypper dup before starting to work on the SoC.
Further reading
- Enclustra Build Environment documentation
- openSUSE on your ARM board
- Source code for the deploy script